How to Set Up a Raspberry Pi as an MQTT Broker
March 15, 2026
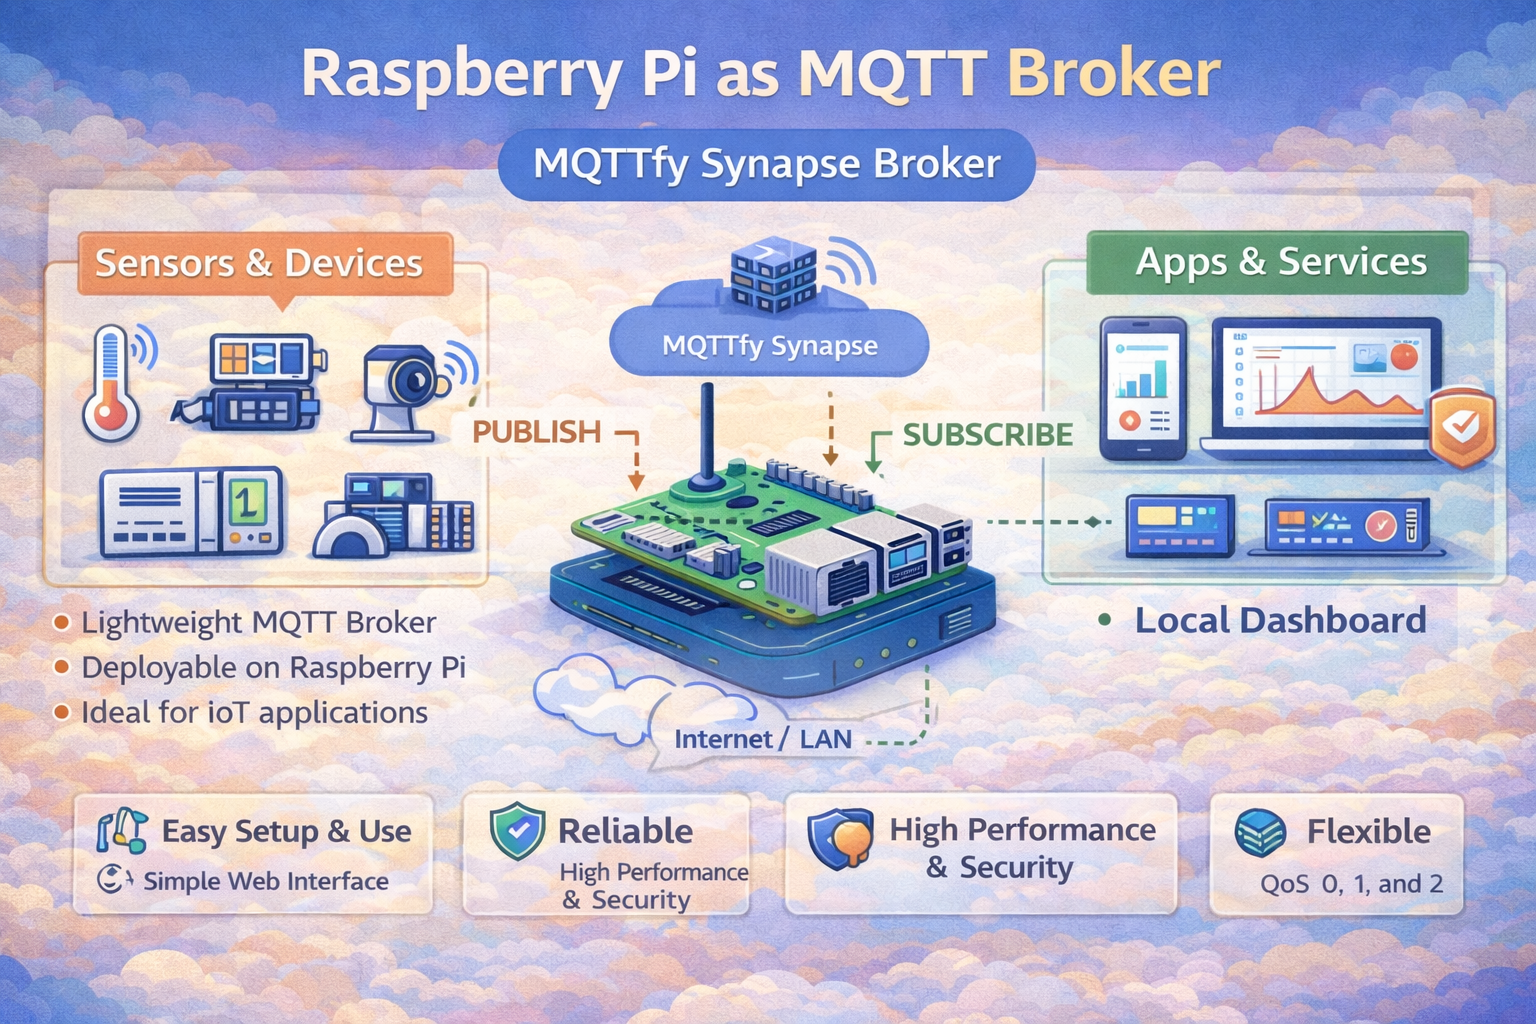
Building Your Own IoT Hub: Setting Up a Raspberry Pi as an MQTT Broker
For any smart home or IoT project built on the MQTT protocol, having a local, reliable broker is a game-changer. It puts you in control of your data, reduces reliance on cloud services, and provides near-instantaneous communication between your devices. A Raspberry Pi is the perfect device for this task: it's low-power, affordable, and more than capable of handling a typical home's MQTT traffic.
This guide will walk you through installing and configuring Mosquitto, one of the most popular open-source MQTT brokers, on your Raspberry Pi.
Prerequisites
- A Raspberry Pi (Model 3B+ or newer recommended).
- Raspberry Pi OS installed and configured on an SD card.
- Access to your Raspberry Pi's terminal (directly or via SSH).
Step 1: Update Your System
Always start by ensuring your system's package lists are up to date.
sudo apt update && sudo apt upgrade -y
Step 2: Install Mosquitto
Mosquitto and its command-line clients are available in the standard repositories.
# Install the Mosquitto broker and the command-line clients
sudo apt install mosquitto mosquitto-clients -y
Once installed, the broker will start automatically. You can enable it to ensure it always starts on boot with sudo systemctl enable mosquitto.
Step 3: Basic Security Configuration
Running an open broker is a security risk. At a minimum, you must set up username and password authentication.
-
Create a Password File: Use the
mosquitto_passwdutility to create a password file. The-cflag creates the file; omit it when adding more users later.# Replace 'myuser' with your desired username sudo mosquitto_passwd -c /etc/mosquitto/passwd myuser -
Create a Configuration File: Tell the broker to use your password file.
# Create and edit a new config file
sudo nano /etc/mosquitto/conf.d/default.conf
Add the following lines:
allow_anonymous false password_file /etc/mosquitto/passwd -
Restart the Broker: Apply the new configuration.
sudo systemctl restart mosquitto
Step 4: Testing Your Broker
Now, test the setup using the command-line clients. These tools are fundamental to understanding the publish-subscribe model.
-
In one terminal (Subscriber):
# Replace 'myuser' and 'mypassword' with your credentials mosquitto_sub -h localhost -t "test/topic" -u "myuser" -P "mypassword" -
In a second terminal (Publisher):
# Replace 'myuser' and 'mypassword' with your credentials
mosquitto_pub -h localhost -t "test/topic" -m "Hello from Raspberry Pi!" -u "myuser" -P "mypassword"
If successful, the message will appear in the subscriber terminal. You now have a working MQTT hub!
Beyond the Basics: From Hobby Project to Robust IoT Hub
Congratulations! You have a functional MQTT broker on your Raspberry Pi. For many home automation enthusiasts and hobbyists, this is all that's needed. However, as you begin to rely on your IoT network more, or consider its use in more critical applications, you will quickly encounter the limitations of this basic setup. This is the point where you transition from a simple message passer to building a truly robust data infrastructure.
Let's explore the advanced configurations and considerations that mark this transition, and understand when a more powerful solution like the Synapse MQTT broker becomes the logical next step.
Advanced Mosquitto Configuration on Raspberry Pi
Your default.conf file can do much more than just disable anonymous access. Here are some critical configurations to enhance your broker's performance and security:
-
Enabling TLS Encryption: While username/password authentication prevents unauthorized clients from connecting, your MQTT messages are still sent in plain text over your network. Anyone on the same Wi-Fi could potentially "sniff" the packets and read your data. To prevent this, you must enable TLS encryption. This involves generating certificates (or using a free service like Let's Encrypt) and pointing to them in your configuration file.
# Add to your /etc/mosquitto/conf.d/default.conf
listener 8883
cafile /path/to/your/ca.crt
keyfile /path/to/your/server.key
certfile /path/to/your/server.crt
This is a non-trivial process but is the single most important security step you can take. For production systems, this is not optional. The security models built into the MQTTfy platform handle this complexity automatically, providing managed certificates and simplified configuration.
-
Access Control Lists (ACLs): A password gives a user access to your entire broker. But what if you want to restrict users to specific topics? For instance, a temperature sensor should only be able to
publishtosensors/temperature, and a dashboard user should only be able tosubscribetosensors/#. This is handled by an ACL file.# In your config file acl_file /etc/mosquitto/acl_file # In your acl_file user tempsensor topic write sensors/temperature user dashboard topic read sensors/#As you add more devices and users with different roles, this file can become extremely complex and prone to error. Managing complex ACLs is a common operational headache, which is why more advanced solutions like the Synapse MQTT broker offer more granular, API-driven security management through a user-friendly interface.
-
Bridging Brokers: What if you have two separate MQTT networks, perhaps in different physical locations, and you want to share data between them? This is achieved through bridging. You can configure your Raspberry Pi broker to connect to another broker (perhaps a cloud-based one) and selectively forward messages. This is useful for creating a hybrid-cloud setup, where local devices communicate with low latency on the Pi, but important data is forwarded to the cloud for storage and long-term analysis. A professionally managed Synapse broker cluster can provide seamless, global data replication without this kind of manual, file-based bridging configuration.
The Raspberry Pi as an Industrial IoT (IIoT) Edge Gateway
The conversation changes significantly when we move from home automation to Industrial IoT (IIoT). In an industrial setting, the Raspberry Pi can still play a role, but its function evolves from being the central hub to being a distributed edge gateway.
In a factory or remote facility, you wouldn't rely on a single Raspberry Pi to run the entire operation. Instead, you might have dozens of them, each responsible for a specific production line or set of machines. In this scenario, the Pi is not the core broker but an intelligent client that performs several critical edge computing tasks:
- Protocol Conversion: Industrial machinery often speaks legacy protocols like Modbus, EtherNet/IP, or Profinet, not MQTT. A Raspberry Pi at the edge can communicate with these machines using specialized hardware (like RS-485 hats) and software libraries, collect the data, and then translate it into standardized MQTT messages for the modern IT world.
- Data Pre-processing and Filtering: A single industrial sensor can generate thousands of data points per second. Sending all this raw data to a central server is inefficient and costly. The Raspberry Pi can perform initial analysis at the edge, calculating averages, detecting anomalies, or running FFTs on vibration data. It then only sends the meaningful, processed information to the central broker. This drastically reduces network bandwidth and cloud processing costs.
- Local Control Loops: For processes that require millisecond response times, you can't afford a round-trip to a cloud server. The Raspberry Pi can be programmed to execute local control logic. If a pressure sensor exceeds a critical threshold, the Pi can send an MQTT message directly to a local actuator to shut off a valve, without any external network dependency. This ensures operational safety and resilience.
In this IIoT architecture, the individual Raspberry Pi gateways would publish their processed data to a much more powerful, high-availability central broker. A single Mosquitto instance on a Pi is a single point of failure. A true industrial system requires a clustered, fault-tolerant broker like the enterprise-grade Synapse MQTT broker, which is designed for 100% uptime and massive scalability.
Scaling Up: When a Raspberry Pi Is Not Enough
A Raspberry Pi running Mosquitto is a fantastic starting point. But as your IoT project grows in complexity, device count, and business criticality, you will inevitably hit the ceiling of what this setup can provide. Recognizing these limitations is key to planning for a scalable and professional IoT infrastructure.
Here are the key indicators that it's time to migrate to a more robust solution:
-
High Availability Becomes Critical: For a home project, if your Pi goes down for an hour, it's an annoyance. For a commercial product or an industrial process, an hour of downtime can mean thousands of dollars in lost revenue. A single Raspberry Pi is a single point of failure. There is no redundancy. If the SD card corrupts, the power supply fails, or the device overheats, your entire network is offline. Professional systems use a broker cluster, where multiple servers work together. If one node fails, the others take over instantly with no service interruption. This is a core feature of the high-availability Synapse MQTT broker.
-
The Connection Count Grows: Mosquitto on a Pi can comfortably handle dozens, perhaps even a few hundred, well-behaved clients. But what happens when your product takes off and you have 10,000 devices in the field? Or 100,000? A single Raspberry Pi simply does not have the CPU, RAM, or network I/O to handle that level of concurrent connections and message throughput. This is the domain of brokers designed for massive scale, like the Synapse broker, which can handle millions of concurrent connections on a single cluster.
-
Complex Security and Multi-Tenancy Are Required: If you are building a product for multiple customers, you need a multi-tenant architecture. You need to guarantee that Customer A can never, under any circumstances, access data from Customer B. While you can try to build this logic with complex ACLs, it becomes an unmanageable nightmare. A professional platform like MQTTfy is designed for multi-tenancy from the ground up, providing complete data isolation and sophisticated, role-based access control for different users within each tenant.
-
The Need for Data Integration and In-Stream Processing: As your system matures, you won't just want to pass messages. You'll want to interact with them. You might want to validate a payload against a schema before it's distributed, enrich a message with data from an external API, or trigger a serverless function when a specific message arrives. While you can build separate microservices to do this, an advanced broker like the agentic Synapse broker can perform these actions in-stream, reducing latency and dramatically simplifying your architecture.
-
Observability and Manageability Become Paramount: When your broker is a black box on your network, how do you debug issues? How do you track down a misbehaving client? How do you monitor performance trends? While you can piece together logs and command-line tools, a managed platform like MQTTfy provides a comprehensive dashboard out of the box. You get detailed analytics on message payloads, client behavior, and system health, turning your broker from a black box into a transparent, manageable system.
In summary, the Raspberry Pi is the perfect tool to learn and prototype with. It gets you 80% of the way there for 20% of the cost and effort. However, for the final 20%—the part that involves reliability, scalability, and security for a real product or business—you need to graduate to a professional-grade solution. The skills you learn on your Pi are directly transferable, but the underlying infrastructure must evolve to meet the demands of a production environment. Exploring the capabilities of a next-generation Synapse broker is the ideal next step in that evolution.
Next Steps
Your broker is ready. The next logical steps are:
- Configure Your Devices: Point your IoT devices, like those based on an ESP32, to your Pi's IP address.
- Improve Reliability: Understand how different Quality of Service levels affect message delivery.
- Visualize Data: Connect a dashboard application, such as that provided by the MQTTfy platform, to monitor your IoT data in real-time.